現在一番新しいローカライズの方法が XLIFF を使ったプロジェクト全体のローカライズになる。
この方法は Base Internationalization 方式でのローカライズを想定している。
Xcode のプロジェクトナビゲーターでプロジェクトを選択した状態でメニューから
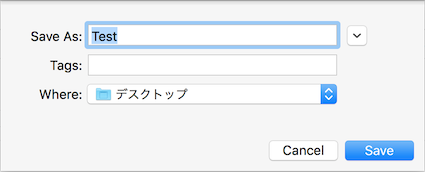
Editor > Export for Localization... を選択する。

保存ダイアログ

保存すると指定したディレクトリにフォルダが作られて en.xliff が保存される。
XLIFF ファイルの中身は以下
<?xml version="1.0" encoding="UTF-8" standalone="no"?>
<xliff xmlns="urn:oasis:names:tc:xliff:document:1.2" xmlns:xsi="http://www.w3.org/2001/XMLSchema-instance" version="1.2" xsi:schemaLocation="urn:oasis:names:tc:xliff:document:1.2 http://docs.oasis-open.org/xliff/v1.2/os/xliff-core-1.2-strict.xsd">
  <file original="Test/Base.lproj/LaunchScreen.storyboard" source-language="en" datatype="plaintext">
    <header>
      <tool tool-id="com.apple.dt.xcode" tool-name="Xcode" tool-version="7.2.1" build-num="7C1002"/>
    </header>
    <body/>
  </file>
  <file original="Test/Base.lproj/Main.storyboard" source-language="en" datatype="plaintext">
    <header>
      <tool tool-id="com.apple.dt.xcode" tool-name="Xcode" tool-version="7.2.1" build-num="7C1002"/>
    </header>
    <body>
      <trans-unit id="H4E-4z-9nL.text">
        <source>Label</source>
        <note>Class = "UILabel"; text = "Label"; ObjectID = "H4E-4z-9nL";</note>
      </trans-unit>
    </body>
  </file>
  <file original="Test/Info.plist" source-language="en" datatype="plaintext">
    <header>
      <tool tool-id="com.apple.dt.xcode" tool-name="Xcode" tool-version="7.2.1" build-num="7C1002"/>
    </header>
    <body>
      <trans-unit id="CFBundleName">
        <source>$(PRODUCT_NAME)</source>
      </trans-unit>
      <trans-unit id="CFBundleShortVersionString">
        <source>1.0</source>
      </trans-unit>
    </body>
  </file>
  <file original="TestTests/Info.plist" source-language="en" datatype="plaintext">
    <header>
      <tool tool-id="com.apple.dt.xcode" tool-name="Xcode" tool-version="7.2.1" build-num="7C1002"/>
    </header>
    <body>
      <trans-unit id="CFBundleName">
        <source>$(PRODUCT_NAME)</source>
      </trans-unit>
      <trans-unit id="CFBundleShortVersionString">
        <source>1.0</source>
      </trans-unit>
    </body>
  </file>
  <file original="TestUITests/Info.plist" source-language="en" datatype="plaintext">
    <header>
      <tool tool-id="com.apple.dt.xcode" tool-name="Xcode" tool-version="7.2.1" build-num="7C1002"/>
    </header>
    <body>
      <trans-unit id="CFBundleName">
        <source>$(PRODUCT_NAME)</source>
      </trans-unit>
      <trans-unit id="CFBundleShortVersionString">
        <source>1.0</source>
      </trans-unit>
    </body>
  </file>
</xliff>
file タグを見ると storyboard ファイル以外に Info.plist といったファイルも全部リストアップされているのが分かる。
Xcode の方で Localize をオンにしているファイルが全てこのようにして XLIFF に含まれる事になる。
またコード上にマクロで以下のように書かれている場合は
NSLocalizedString(@"key", @"comment");
XLIFF の中身に以下が追加される。
  <file original="Test/Localizable.strings" source-language="en" datatype="plaintext" target-language="ja">
    <header>
      <tool tool-id="com.apple.dt.xcode" tool-name="Xcode" tool-version="7.2.1" build-num="7C1002"/>
    </header>
    <body>
      <trans-unit id="key">
        <source>key</source>
        <note>comment</note>
      </trans-unit>
    </body>
  </file>
素晴らしい事に、XLIFF を使うと xib, storyboard, ソースファイル、その他テキストファイルの全てで必要な翻訳を一括して管理できる。
ちなみに先ほど作ったファイルの中身は
source-language="en"
となっていてソースの言語にデフォルトの en が入っている。
Xcode のプロジェクトの翻訳ベースがデフォルトでは英語に設定されているのでこのようにソース言語が en の指定になっている。
そして XLIFF の中身で重要なのが以下
<trans-unit id="H4E-4z-9nL.text">
  <source>Label</source>
  <note>Class = "UILabel"; text = "Label"; ObjectID = "H4E-4z-9nL";</note>
</trans-unit>
trans-unit の id がキー文字
source が元言語での文字列
note はコメント部分になる
XLIFF の書き出し
Xcode のプロジェクト設定の Localizations で Japanese を追加してXLIFFの書き出しを行う。

するとダイアログには既存のローカライズ言語を書き出すかどうかのオプションが表示される。

保存すると指定したディレクトリにフォルダが作られて en.xliff と ja.xliff が保存される。
以下は ja.xliff の一部抜粋
  <file original="Test/Base.lproj/Main.storyboard" source-language="en" datatype="plaintext" target-language="ja">
    <header>
      <tool tool-id="com.apple.dt.xcode" tool-name="Xcode" tool-version="7.2.1" build-num="7C1002"/>
    </header>
    <body>
      <trans-unit id="H4E-4z-9nL.text">
        <source>Label</source>
        <target>Label</target>
        <note>Class = "UILabel"; text = "Label"; ObjectID = "H4E-4z-9nL";</note>
      </trans-unit>
    </body>
  </file>
先ほどの source-language="en" の指定に加えて target-language="ja" が追加されている。
そして source の下に target が設定されている。このターゲットの中身を変更してローカライズ作業をしていく。
XLIFF の読み込み
以下のように target を編集して翻訳を行ったら
<trans-unit id="H4E-4z-9nL.text">
  <source>Label</source>
  <target>ラベル</target>
  <note>Class = "UILabel"; text = "Label"; ObjectID = "H4E-4z-9nL";</note>
</trans-unit>
Xcode のメニューの
Editor > Import Localization... を選択する。

読み込むXLIFFファイルを選択すると読み込み後の結果を確認する画面が表示されて

ファイルを読み込むとそれぞれのローカライズテキストの .strings に結果が反映される。

xib, storyboard 編集後の翻訳の更新
storyboard を編集し画面にボタンを追加する。
XLIFF を書き出すと中身は以下のようになっている
<trans-unit id="H4E-4z-9nL.text">
  <source>Label</source>
  <target>ラベル</target>
  <note>Class = "UILabel"; text = "Label"; ObjectID = "H4E-4z-9nL";</note>
</trans-unit>
<trans-unit id="xCS-6h-0Sr.normalTitle">
  <source>Button</source>
  <note>Class = "UIButton"; normalTitle = "Button"; ObjectID = "xCS-6h-0Sr";</note>
</trans-unit>
翻訳済みのものは翻訳済みの内容が反映されていて、新たに追加された要素は target が空になっている。
<target>ボタン</target> のように target を追加して翻訳を行ったら Xcode で編集した XLIFF を読み込む。

すると新しく翻訳を行った要素が適切な .strings に追加されている。
XLIFF を使えば xib, storyboard の編集後の翻訳の更新を簡単に行う事ができる。
また、読み込みの際に未翻訳のテキストを一覧表示してくれる機能があるのでローカライズ漏れがないようにチェックする事もできる。

xcodebuild で XLIFF の書き出し
man のサンプルは以下
xcodebuild -exportLocalizations -project name.xcodeproj -localizationPath path [[-exportLanguage language] ...]
サンプル
書き出し言語毎に -exportLanguage を指定する。
この例では ja.xliff, ru.xliff, de.xliff, it.xliff の4つが作成される。
xcodebuild -exportLocalizations -project <xcode_project_file_path> -localizationPath <directory_path> -exportLanguage ja -exportLanguage ru -exportLanguage de -exportLanguage it
xocdebuild での XLIFF の読み込み
man のサンプルは以下
xcodebuild -importLocalizations -project name.xcodeproj -localizationPath path
サンプル
`xcodebuild -importLocalizations -project <xcode_project_file_path> -localizationPath <translated_xliff_path>
読み込む XLIFF ファイル内で <target> が存在しない未翻訳の部分があると
Incoming translated string is missing (Key: "<Key>") という形でエラーを出してくれる。
まとめ
XLIFF を使うとプロジェクト全体で必要な翻訳をまとめて行うことが出来る。
UIの追加更新にも対応できる。
コマンドラインベースでの書き出しと読み込みもサポートしていて自動化もできる。
あとは XLIFF をいい感じに扱えるエディタか翻訳を流し込みできるスクリプトやツールがあればローカライズ作業はかなり捗る。
関連