ObjecTips

Swift & Objective-C で iOS とか macOS とか

XLIFF ファイルを使ってローカライズ

現在一番新しいローカライズの方法が XLIFF を使ったプロジェクト全体のローカライズになる。
この方法は Base Internationalization 方式でのローカライズを想定している。

Xcode のプロジェクトナビゲーターでプロジェクトを選択した状態でメニューから
Editor > Export for Localization... を選択する。

f:id:Koze:20160223233520p:plain

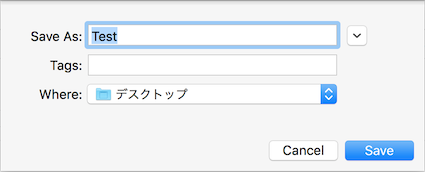
保存ダイアログ
f:id:Koze:20160223233709p:plain

保存すると指定したディレクトリにフォルダが作られて en.xliff が保存される。
XLIFF ファイルの中身は以下

<?xml version="1.0" encoding="UTF-8" standalone="no"?>
<xliff xmlns="urn:oasis:names:tc:xliff:document:1.2" xmlns:xsi="http://www.w3.org/2001/XMLSchema-instance" version="1.2" xsi:schemaLocation="urn:oasis:names:tc:xliff:document:1.2 http://docs.oasis-open.org/xliff/v1.2/os/xliff-core-1.2-strict.xsd">
  <file original="Test/Base.lproj/LaunchScreen.storyboard" source-language="en" datatype="plaintext">
    <header>
      <tool tool-id="com.apple.dt.xcode" tool-name="Xcode" tool-version="7.2.1" build-num="7C1002"/>
    </header>
    <body/>
  </file>
  <file original="Test/Base.lproj/Main.storyboard" source-language="en" datatype="plaintext">
    <header>
      <tool tool-id="com.apple.dt.xcode" tool-name="Xcode" tool-version="7.2.1" build-num="7C1002"/>
    </header>
    <body>
      <trans-unit id="H4E-4z-9nL.text">
        <source>Label</source>
        <note>Class = "UILabel"; text = "Label"; ObjectID = "H4E-4z-9nL";</note>
      </trans-unit>
    </body>
  </file>
  <file original="Test/Info.plist" source-language="en" datatype="plaintext">
    <header>
      <tool tool-id="com.apple.dt.xcode" tool-name="Xcode" tool-version="7.2.1" build-num="7C1002"/>
    </header>
    <body>
      <trans-unit id="CFBundleName">
        <source>$(PRODUCT_NAME)</source>
      </trans-unit>
      <trans-unit id="CFBundleShortVersionString">
        <source>1.0</source>
      </trans-unit>
    </body>
  </file>
  <file original="TestTests/Info.plist" source-language="en" datatype="plaintext">
    <header>
      <tool tool-id="com.apple.dt.xcode" tool-name="Xcode" tool-version="7.2.1" build-num="7C1002"/>
    </header>
    <body>
      <trans-unit id="CFBundleName">
        <source>$(PRODUCT_NAME)</source>
      </trans-unit>
      <trans-unit id="CFBundleShortVersionString">
        <source>1.0</source>
      </trans-unit>
    </body>
  </file>
  <file original="TestUITests/Info.plist" source-language="en" datatype="plaintext">
    <header>
      <tool tool-id="com.apple.dt.xcode" tool-name="Xcode" tool-version="7.2.1" build-num="7C1002"/>
    </header>
    <body>
      <trans-unit id="CFBundleName">
        <source>$(PRODUCT_NAME)</source>
      </trans-unit>
      <trans-unit id="CFBundleShortVersionString">
        <source>1.0</source>
      </trans-unit>
    </body>
  </file>
</xliff>

file タグを見ると storyboard ファイル以外に Info.plist といったファイルも全部リストアップされているのが分かる。
Xcode の方で Localize をオンにしているファイルが全てこのようにして XLIFF に含まれる事になる。

またコード上にマクロで以下のように書かれている場合は

NSLocalizedString(@"key", @"comment");

XLIFF の中身に以下が追加される。

  <file original="Test/Localizable.strings" source-language="en" datatype="plaintext" target-language="ja">
    <header>
      <tool tool-id="com.apple.dt.xcode" tool-name="Xcode" tool-version="7.2.1" build-num="7C1002"/>
    </header>
    <body>
      <trans-unit id="key">
        <source>key</source>
        <note>comment</note>
      </trans-unit>
    </body>
  </file>

素晴らしい事に、XLIFF を使うと xib, storyboard, ソースファイル、その他テキストファイルの全てで必要な翻訳を一括して管理できる。

ちなみに先ほど作ったファイルの中身は
source-language="en"
となっていてソースの言語にデフォルトの en が入っている。
Xcode のプロジェクトの翻訳ベースがデフォルトでは英語に設定されているのでこのようにソース言語が en の指定になっている。

そして XLIFF の中身で重要なのが以下

<trans-unit id="H4E-4z-9nL.text">
  <source>Label</source>
  <note>Class = "UILabel"; text = "Label"; ObjectID = "H4E-4z-9nL";</note>
</trans-unit>

trans-unitid がキー文字
source が元言語での文字列
note はコメント部分になる

XLIFF の書き出し

Xcode のプロジェクト設定の Localizations で Japanese を追加してXLIFFの書き出しを行う。

f:id:Koze:20160224014443p:plain

するとダイアログには既存のローカライズ言語を書き出すかどうかのオプションが表示される。

f:id:Koze:20160224000725p:plain

保存すると指定したディレクトリにフォルダが作られて en.xliff と ja.xliff が保存される。
以下は ja.xliff の一部抜粋

  <file original="Test/Base.lproj/Main.storyboard" source-language="en" datatype="plaintext" target-language="ja">
    <header>
      <tool tool-id="com.apple.dt.xcode" tool-name="Xcode" tool-version="7.2.1" build-num="7C1002"/>
    </header>
    <body>
      <trans-unit id="H4E-4z-9nL.text">
        <source>Label</source>
        <target>Label</target>
        <note>Class = "UILabel"; text = "Label"; ObjectID = "H4E-4z-9nL";</note>
      </trans-unit>
    </body>
  </file>

先ほどの source-language="en" の指定に加えて target-language="ja" が追加されている。
そして source の下に target が設定されている。このターゲットの中身を変更してローカライズ作業をしていく。

XLIFF の読み込み

以下のように target を編集して翻訳を行ったら

<trans-unit id="H4E-4z-9nL.text">
  <source>Label</source>
  <target>ラベル</target>
  <note>Class = "UILabel"; text = "Label"; ObjectID = "H4E-4z-9nL";</note>
</trans-unit>

Xcode のメニューの
Editor > Import Localization... を選択する。

f:id:Koze:20160224002100p:plain

読み込むXLIFFファイルを選択すると読み込み後の結果を確認する画面が表示されて

f:id:Koze:20160224002510p:plain

ファイルを読み込むとそれぞれのローカライズテキストの .strings に結果が反映される。

f:id:Koze:20160224002802p:plain

xib, storyboard 編集後の翻訳の更新

storyboard を編集し画面にボタンを追加する。
XLIFF を書き出すと中身は以下のようになっている

<trans-unit id="H4E-4z-9nL.text">
  <source>Label</source>
  <target>ラベル</target>
  <note>Class = "UILabel"; text = "Label"; ObjectID = "H4E-4z-9nL";</note>
</trans-unit>
<trans-unit id="xCS-6h-0Sr.normalTitle">
  <source>Button</source>
  <note>Class = "UIButton"; normalTitle = "Button"; ObjectID = "xCS-6h-0Sr";</note>
</trans-unit>

翻訳済みのものは翻訳済みの内容が反映されていて、新たに追加された要素は target が空になっている。
<target>ボタン</target> のように target を追加して翻訳を行ったら Xcode で編集した XLIFF を読み込む。

f:id:Koze:20160224013623p:plain

すると新しく翻訳を行った要素が適切な .strings に追加されている。
XLIFF を使えば xib, storyboard の編集後の翻訳の更新を簡単に行う事ができる。

また、読み込みの際に未翻訳のテキストを一覧表示してくれる機能があるのでローカライズ漏れがないようにチェックする事もできる。

f:id:Koze:20160224015754p:plain

xcodebuild で XLIFF の書き出し

man のサンプルは以下
xcodebuild -exportLocalizations -project name.xcodeproj -localizationPath path [[-exportLanguage language] ...]

サンプル
書き出し言語毎に -exportLanguage を指定する。
この例では ja.xliff, ru.xliff, de.xliff, it.xliff の4つが作成される。
xcodebuild -exportLocalizations -project <xcode_project_file_path> -localizationPath <directory_path> -exportLanguage ja -exportLanguage ru -exportLanguage de -exportLanguage it

xocdebuild での XLIFF の読み込み

man のサンプルは以下
xcodebuild -importLocalizations -project name.xcodeproj -localizationPath path

サンプル
`xcodebuild -importLocalizations -project <xcode_project_file_path> -localizationPath <translated_xliff_path>

読み込む XLIFF ファイル内で <target> が存在しない未翻訳の部分があると
Incoming translated string is missing (Key: "<Key>") という形でエラーを出してくれる。


まとめ

XLIFF を使うとプロジェクト全体で必要な翻訳をまとめて行うことが出来る。
UIの追加更新にも対応できる。
コマンドラインベースでの書き出しと読み込みもサポートしていて自動化もできる。

あとは XLIFF をいい感じに扱えるエディタか翻訳を流し込みできるスクリプトツールがあればローカライズ作業はかなり捗る。

関連

ibtool を使って incremental にローカライズ

前回

今回は前回の ibtool を使ったローカライズの話の続き

ibtool には incremental localization という機能がある。
コマンドの形式
ibtool --previous-file <old_file> --incremental-file <old_translated_file> --localize-incremental --write <new_translated_file> <current_modified_file>

--previous-file <old_file> には翻訳元の古いファイル(編集前ファイル)を指定

f:id:Koze:20160223001449p:plain

--incremental-file <old_translated_file> には翻訳済みの古いファイル(編集前ファイル)を指定
インクリメンタルの効果を分かりやすくするために文字列の翻訳以外にラベルの位置も変更している。つまり言語毎の xib storyboard ファイルを別個に編集済みの状態。

f:id:Koze:20160223001509p:plain

--write <new_translated_file> には新規に作成する翻訳済みファイルを指定

最後に更新済みの翻訳元ファイル <current_modified_file> を指定
更新内容は以下の通りボタンを追加している

f:id:Koze:20160223001546p:plain

コマンドを実行
ibtool --previous-file Main_old.storyboard --incremental-file Main_ja_old.storyboard --localize-incremental --write Main_new_translated.storyboard Main.storyboard

作成された Main_new_translated.storyboard の中身は以下

f:id:Koze:20160223001932p:plain

翻訳済みの古いファイル(編集前ファイル)に翻訳元ファイルの変更点のみが反映されている。
(この時ボタンの追加以外にラベルの位置も変更していたとすると、それも変更点として扱われ生成後のファイルには新しいラベル位置が反映される。今回はラベルは移動させていないので変更無しと扱われて、翻訳済みの古いファイル(編集前ファイル)のラベル位置がキープされている)


コマンド実行時に --import-strings-file を使って更新分の翻訳も同時に行う事ができる。
genstrings などを使って更新内容分の strings ファイルを用意しておく。

/* Class = "UIButton"; normalTitle = "Button"; ObjectID = "WnY-Sl-xIW"; */
"WnY-Sl-xIW.normalTitle" = "Button";

コマンド
ibtool --previous-file Main_old.storyboard --incremental-file Main_ja_old.storyboard --localize-incremental --write Main_new_translated.storyboard --import-strings-file Main_diff.strings Main.storyboard

作成された Main_new_translated.storyboard を見ると以下のように更新を反映しつつ翻訳も同時に行われている。

f:id:Koze:20160223002941p:plain


ibtool を使った incremental なローカライズを駆使すると言語毎に大きく異なるレイアウトの xib storyboard を使いつつ上手く翻訳を反映していく事が出来そう。ただし作業は複雑。
今は Base Internationalization が主流だし、その仕組みの中で Auto Layout を駆使して言語別のレイアウト変更に対応するのがベターだと思う。

関連

ibtool を使ってローカライズ

サンプルに使用する Main.storyboard ファイルは ViewController の上に1つ UILabel が載っているだけの状態

f:id:Koze:20160222034716p:plain

storyboard ファイルの中身のXMLは以下

<?xml version="1.0" encoding="UTF-8" standalone="no"?>
<document type="com.apple.InterfaceBuilder3.CocoaTouch.Storyboard.XIB" version="3.0" toolsVersion="9532" systemVersion="15D21" targetRuntime="iOS.CocoaTouch" propertyAccessControl="none" useAutolayout="YES" useTraitCollections="YES" initialViewController="BYZ-38-t0r">
    <dependencies>
        <plugIn identifier="com.apple.InterfaceBuilder.IBCocoaTouchPlugin" version="9530"/>
    </dependencies>
    <scenes>
        <!--View Controller-->
        <scene sceneID="tne-QT-ifu">
            <objects>
                <viewController id="BYZ-38-t0r" customClass="ViewController" sceneMemberID="viewController">
                    <layoutGuides>
                        <viewControllerLayoutGuide type="top" id="y3c-jy-aDJ"/>
                        <viewControllerLayoutGuide type="bottom" id="wfy-db-euE"/>
                    </layoutGuides>
                    <view key="view" contentMode="scaleToFill" id="8bC-Xf-vdC">
                        <rect key="frame" x="0.0" y="0.0" width="600" height="600"/>
                        <autoresizingMask key="autoresizingMask" widthSizable="YES" heightSizable="YES"/>
                        <subviews>
                            <label opaque="NO" userInteractionEnabled="NO" contentMode="left" horizontalHuggingPriority="251" verticalHuggingPriority="251" fixedFrame="YES" text="Label" textAlignment="natural" lineBreakMode="tailTruncation" baselineAdjustment="alignBaselines" adjustsFontSizeToFit="NO" translatesAutoresizingMaskIntoConstraints="NO" id="H4E-4z-9nL">
                                <rect key="frame" x="20" y="20" width="80" height="21"/>
                                <fontDescription key="fontDescription" type="system" pointSize="17"/>
                                <color key="textColor" red="0.0" green="0.0" blue="0.0" alpha="1" colorSpace="calibratedRGB"/>
                                <nil key="highlightedColor"/>
                            </label>
                        </subviews>
                        <color key="backgroundColor" white="1" alpha="1" colorSpace="custom" customColorSpace="calibratedWhite"/>
                    </view>
                </viewController>
                <placeholder placeholderIdentifier="IBFirstResponder" id="dkx-z0-nzr" sceneMemberID="firstResponder"/>
            </objects>
            <point key="canvasLocation" x="506" y="407"/>
        </scene>
    </scenes>
</document>
strings の生成

ibtool --generate-strings-file Main.strings Main.storyboard
または
ibtool --export-strings-file Main.strings Main.storyboard

生成された strings

/* Class = "UILabel"; text = "Label"; ObjectID = "H4E-4z-9nL"; */
"H4E-4z-9nL.text" = "Label";
xliff の生成

ibtool --export-xliff Main.xliff Main.storyboard

生成された .xliff

<?xml version="1.0" encoding="UTF-8" standalone="no"?>
<xliff xmlns="urn:oasis:names:tc:xliff:document:1.2" xmlns:xsi="http://www.w3.org/2001/XMLSchema-instance" xmlns:ib="com.apple.InterfaceBuilder3" version="1.2" xsi:schemaLocation="urn:oasis:names:tc:xliff:document:1.2 xliff-core-1.2-transitional.xsd">
    <file original="Main.storyboard" datatype="x-com.apple.InterfaceBuilder3.Storyboard.XIB" tool-id="com.apple.ibtool" source-language="en">
        <header>
            <tool tool-id="com.apple.ibtool" tool-name="ibtool" tool-version="9532"></tool>
        </header>
        <body>
            <group ib:member-type="objects">
                <group ib:object-id="BYZ-38-t0r" ib:class="UIViewController">
                    <group ib:object-id="y3c-jy-aDJ" ib:class="NSObject"></group>
                    <group ib:object-id="wfy-db-euE" ib:class="NSObject"></group>
                    <group ib:object-id="8bC-Xf-vdC" ib:class="UIView">
                        <group ib:object-id="H4E-4z-9nL" ib:class="UILabel">
                            <trans-unit ib:key-path-category="string" id="H4E-4z-9nL.text" ib:key-path="text">
                                <source>Label</source>
                            </trans-unit>
                        </group>
                    </group>
                </group>
                <group ib:object-id="pQ7-8c-0OJ" ib:class="UIStoryboardEntryPointIndicator"></group>
            </group>
            <group ib:member-type="connections"></group>
        </body>
    </file>
</xliff>

ちなみに
ibtool --export-xliff Main.xliff --source-language ja --target-language ru Main.storyboard

とオプションを付けると xliff の3行目の末尾に以下のように source-language と target-language の指定が入る。

    <file original="Main.storyboard" datatype="x-com.apple.InterfaceBuilder3.Storyboard.XIB" tool-id="com.apple.ibtool" source-language="ja" target-language="ru">

storyboard 上で英語以外の言語でパーツを配置しているような場合にこのオプションを使って xliff を書き出すといいのかも知れない。


ibtool は xib や storyboard 自体がローカライズされて複数ファイル存在するケースでのローカライズを想定した機能になっているようで、翻訳したファイルと元の xib, storyboard ファイルを使って言語別の xib, storyboard 作ったり、生成済みの言語別 xib, storyboard ファイルに翻訳済みのファイルの内容を反映する事が出来るらしい。
でも今時は言語別に xib, storybpard ファイルを作らないで strings ファイルを複数作って適応させる Base Internationalization の方法が主流だと思うので ibtool での xib, storyboard ファイルの生成はあまり使わないかも。

strings ファイルの利用

翻訳した strings ファイル

/* Class = "UILabel"; text = "Label"; ObjectID = "H4E-4z-9nL"; */
"H4E-4z-9nL.text" = "ラベル";

以下のコマンドで翻訳済み strings を使って翻訳を反映した storyboard ファイルを生成する
--import-strings Main.strings --write Main_ja.storyboard Main.storyboard

xliff の利用

source タグの下に target タグを追加して翻訳する

<source>Label</source>
<target>ラベル</ラベル>>
<?xml version="1.0" encoding="UTF-8" standalone="no"?>
<xliff xmlns="urn:oasis:names:tc:xliff:document:1.2" xmlns:xsi="http://www.w3.org/2001/XMLSchema-instance" xmlns:ib="com.apple.InterfaceBuilder3" version="1.2" xsi:schemaLocation="urn:oasis:names:tc:xliff:document:1.2 xliff-core-1.2-transitional.xsd">
    <file original="Main.storyboard" datatype="x-com.apple.InterfaceBuilder3.Storyboard.XIB" tool-id="com.apple.ibtool" source-language="en">
        <header>
            <tool tool-id="com.apple.ibtool" tool-name="ibtool" tool-version="9532"></tool>
        </header>
        <body>
            <group ib:member-type="objects">
                <group ib:object-id="BYZ-38-t0r" ib:class="UIViewController">
                    <group ib:object-id="y3c-jy-aDJ" ib:class="NSObject"></group>
                    <group ib:object-id="wfy-db-euE" ib:class="NSObject"></group>
                    <group ib:object-id="8bC-Xf-vdC" ib:class="UIView">
                        <group ib:object-id="H4E-4z-9nL" ib:class="UILabel">
                            <trans-unit ib:key-path-category="string" id="H4E-4z-9nL.text" ib:key-path="text">
                                <source>Label</source>
                                <target>ラベル</target>
                            </trans-unit>
                        </group>
                    </group>
                </group>
                <group ib:object-id="h1d-p0-wP2" ib:class="UIStoryboardEntryPointIndicator"></group>
            </group>
            <group ib:member-type="connections"></group>
        </body>
    </file>
</xliff>

以下のコマンドで翻訳済み xliff を使って翻訳を反映した xib, storyboard ファイルを生成する
ibtool --import-xliff Main.xliff --write Main_ja.storyboard Main.storyboard

生成された Main_ja.storyboard を開いてみると翻訳が反映されている。

f:id:Koze:20160222034732p:plain


続き

関連

genstrings で Localizable.strings を生成する

genstrings は C や Objective-Cソースコードファイルから .strings ファイルを生成するユーティリティで、以下のマクロと関数を Localizable.strings に書き出してくれる。

NSLocalizedString("key", comment);
CFCopyLocalizedString("key", comment);

また、以下のマクロと関数の場合はテーブル名の .strings ファイルに書き出してくれる。

NSLocalizedStringFromTable("key", Table, comment);
CFCopyLocalizedStringFromTable("key", Table, comment);
NSLocalizedStringFromTableInBundle("key", Table, bundle, comment);
CFCopyLocalizedStringFromTableInBundle("key", Table, bundle, comment);
NSLocalizedStringWithDefaultValue("key", Table, bundle, "value", comment);
CFCopyLocalizedStringWithDefaultValue("key", Table, bundle, "value", comment);

例えば .m ファイルに以下のように記述する。

NSLocalizedString(@"key", @"comment");

そしてターミナル等で genstrings <filepath> とコマンドを実行するとカレントディレクトリに Localizable.strings を生成してくれて、そのファイルの中身は以下のようになっている。

/* comment */
"key" = "key";

ちなみに試してみたところソース上でコメントアウトしている部分に関しても抽出してエントリに追加してくれるらしい。

このコマンドはデフォルトではファイルの上書き保存をするだけでマージはしてくれないので、genstrings で Localizable.strings を生成後に strings ファイルを編集してローカライズを行った後、再びこのコマンドを呼ぶと編集内容が全てクリアされてしまう。
genstrings でファイル生成後にソース上に NSLocalizedString が追記された場合は手動でそれを Localizable.strings に反映させてやる必要がある。


-a オプションの説明には append output to the old strings files. と書かれているが、文字通りエントリを追記していくのみで重複のチェックまでは行ってくれない。
例えばソースに以下のように書かれた .m ファイルに対して

NSLocalizedString(@"key", @"comment");

以下のように2回コマンドを実行する。

genstrings <filepath>

するとこのようにエントリが単に追記されるだけになる。

/* comment */
"key" = "key";

/* comment */
"key" = "key";

genstrings コマンド自体はそこそこ使える機能だけど重複チェックや差分のマージなど足りない点もあるので他のコマンドやプログラムと組み合わせて使うと良さそう。

関連

Localizable.strings ファイルを plutil で読み込んで変換する

plutil -- property list utility コマンドで Localizable.strings (strings file format) を読み込む事が出来るらしいので試してみる。

元ファイルは以下

/*
 Localizable.strings
 Test
 */

"Yes" = "はい";
"No" = "いいえ";
"Cancel" = "キャンセル";
"Title" = "タイトル";

変換オプションは plutil -convert <fmt> <filepath>
で fmt は xml1, binary1, json の3つ

XML

コマンド plutil -convert xml1 <filepath>

結果

<?xml version="1.0" encoding="UTF-8"?>
<!DOCTYPE plist PUBLIC "-//Apple//DTD PLIST 1.0//EN" "http://www.apple.com/DTDs/PropertyList-1.0.dtd">
<plist version="1.0">
<dict>
    <key>Cancel</key>
    <string>キャンセル</string>
    <key>No</key>
    <string>いいえ</string>
    <key>Title</key>
    <string>タイトル</string>
    <key>Yes</key>
    <string>はい</string>
</dict>
</plist>
JSON

コマンド plutil -convert json <filepath>

結果

{"Yes":"はい","Cancel":"キャンセル","No":"いいえ","Title":"タイトル"}
Binary Plist

コマンド plutil -convert binary1 <filepath>

結果
中身のテキストはXMLと同じで、フォーマットが binary plist 形式になっている。

JSONフォーマットオプション

JSON変換用のオプションで空白と改行を入れて human-readable にする
plutil -convert json -r <filepath>

結果

{
  "Yes" : "はい",
  "Cancel" : "キャンセル",
  "No" : "いいえ",
  "Title" : "タイトル"
}
拡張子オプション

ファイルを上書きせず元ファイルと同じディレクトリへ指定した拡張子でファイルを書き出す。

plutil -convert json -e json <filepath>
plutil -convert xml1 -e xml <filepath>
plutil -convert binary1 -e plist <filepath>
書き出し先オプション

書き出し先のファイルパスを指定
plutil -convert json -o <output_filepath> <filepath>

lint

ファイルフォーマットが正しいかどうかを調べ、セミコロンが抜けている箇所などを教えてくれる
plutil -lint <filepath>

結果

<filepath>: OK
CFPropertyListCreateFromXMLData(): Old-style plist parser: missing semicolon in dictionary on line 8. Parsing will be abandoned. Break on _CFPropertyListMissingSemicolon to debug.
<filepath>: Unexpected character / at line 1

という事で plutil の中身は CFPropertyListCreateFromXMLData で動いているらしい。


plutil を使った時の難点

  • JSONは仕方ないとして、XMLの時にも書き出し後のファイルのキーの順序がソートされて元の並びと異なってしまう
  • コメント情報が消えてしまう

そもそも strings file format での書き出しが出来ないので読み込みにしか使えないのがイマイチ。

関連

Localizable.strings ファイルを Cocoa で読み書きする

ローカライズに用いる Localizable.strings ファイルは NSDictionary で簡単に読み書きができる。
例えば以下のような Localizable.strings があった時

/* 
  Localizable.strings
  Test
*/

"Yes" = "はい";
"No" = "いいえ";
"Cancel" = "キャンセル";
"Title" = "タイトル";
読み込み
    NSURL *URL; // URL to read
    NSDictionary *dict = [NSDictionary dictionaryWithContentsOfURL:URL];
    NSLog(@"%@", dict);

ログ出力

{
    Cancel = "\U30ad\U30e3\U30f3\U30bb\U30eb";
    No = "\U3044\U3044\U3048";
    Title = "\U30bf\U30a4\U30c8\U30eb";
    Yes = "\U306f\U3044";
}
書き出し
    NSURL *temporaryURL = [[NSURL fileURLWithPath:NSTemporaryDirectory()] URLByAppendingPathComponent:@"temporary.strings"];
    [dict.descriptionInStringsFileFormat writeToURL:temporaryURL atomically:YES encoding:NSUTF8StringEncoding error:nil];

書き出されたファイル

"Yes" = "\U306f\U3044";
"Cancel" = "\U30ad\U30e3\U30f3\U30bb\U30eb";
"No" = "\U3044\U3044\U3048";
"Title" = "\U30bf\U30a4\U30c8\U30eb";

NSDictionary を使った時には以下の難点がある

  • 書き出し後のファイルのキーの順序がソートされて元の並びと異なってしまう
  • コメントが消えてしまう
  • 日本語がユニコードのエスケープシーケンスの形になってしまう

という事で、単純にファイル内のキーと値を読み込む分には良いけど値を加工して書き出す場合にはオススメできない。

関連

SSReadingList で出来る事

リーディングリスト周りのAPIを使って何が出来るのか調査。
Framework は SafariServices.framework でリーディングリスト周りのクラスは SSReadingList のみ。

API は以下

イニシャライザ
+ (nullable SSReadingList *)defaultReadingList;
- (instancetype)init NS_UNAVAILABLE;

ヘッダには alloc init を使わず defaultReadingList を使えと書いてある。
また、リーディングリストへのアクセスが許可されていない場合は nil が返ってくるとの事。
と言ってもリーディングリストへのプライバシーアクセスのAPIは現状では用意されていないようで、設定や機能制限などいろいろいじってみても返り値が nil になる事はなかった。

クラスメソッド
+ (BOOL)supportsURL:(NSURL *)URL;

引数のURLがリーディングリストでサポートされている(追加可能)かどうか。

インスタンスメソッド
- (BOOL)addReadingListItemWithURL:(NSURL *)URL title:(nullable NSString *)title previewText:(nullable NSString *)previewText error:(NSError **)error NS_AVAILABLE_IOS(7_0);

リーディングリストにURLを追加する。
title と previewText で表示するタイトルとサマリーをカスタマイズ出来る。
もしURLが追加されなかった場合はNOが返ってきて引数のエラーに値が設定される。
エラーのドメインSSReadingListErrorDomain でエラーコードは現時点では SSReadingListErrorURLSchemeNotAllowed = 1 の1つのみ。
ヘッダによればサポートするスキームは http:// と https:// のみとの事。

title に @"Title" previewText に @"PreviewText" と引数を渡してリーディングリストに登録すると以下のように設定したタイトル、ウェブページのページタイトル、設定したプレビューテキストが表示される。

f:id:Koze:20160215081228p:plain

title と previewText に nil を渡すと以下のようにタイトルにはURLが入り、ウェブページのページタイトルが表示され、プレビューテキストは無しというような表示になる。

f:id:Koze:20160215081231p:plain

いずれの場合も一度リーディングリストからURLを開くと、設定済みのタイトルとプレビューテキストは破棄されて Safari がよしなに値を設定してくれる。

f:id:Koze:20160215083853p:plain

APIは以上。

まとめ

iOS 9の時点で SSReadingList で出来る事はURLの追加のみ。
リーディングリストの取得編集は不可。残念。
しかしヘッダのコメントの文言から推察するに将来プライバシーアクセス付きでリーディングリストへのアクセスが許可されるかも知れない。(バグレポへの要望次第?)

ちなみに Private API を調べてみたけど SSReadingListWebBookmarksXPCConnection というプライベートクラスを介して動いているらしくSSReadingList から直接リーディングリストの取得編集はできなかった。