ObjecTips

Swift & Objective-C で iOS とか macOS とか

Core Dataのデータベースの保存場所を切り替える

保存場所を固定的に変更する方法は前回の記事を参照

koze.hatenablog.jp

今回の保存場所の切り替えというのは既に使用している A.sqlite ファイルから別の B.sqlite を使用するようにしたりまた A.sqlite に戻したりするという意味での動的な切り替え。
利用ケースの想定としては

  • ローカルDBとクラウド上のデータのローカルキャッシュのDBを分けて管理する *1
  • サービスのアカウント毎にローカルキャッシュのDBファイルを切り替える *2
  • ローカルデータを削除せず、テストデータを読み込ませてまた後にローカルデータへ戻す *3

等々。

実装

実装はシンプル。Xcode のテンプレートに沿って AppDelegate への実装とする。
まず NSPersistentContainer の管理クラス(ここでは AppDelegate)にDBのURLを設定出来るようにする。

#import <UIKit/UIKit.h>
#import <CoreData/CoreData.h>

@interface AppDelegate : UIResponder <UIApplicationDelegate>

@property (strong, nonatomic) UIWindow *window;
@property (readonly, strong) NSPersistentContainer *persistentContainer;
@property (strong) NSURL *databaseURL; // <-- here

- (void)saveContext;

@end

databaseURL が設定されたら値を保持して、persistentContainer を nil にする。

- (void)setDatabaseURL:(NSURL *)databaseURL
{
    _databaseURL = databaseURL;
    _persistentContainer = nil;
}

persistentContainer の初期化コードにこの databaseURL を使って初期化するよう仕込む。
初期化処理は次に persistentContainer メソッドが呼ばれる時に実行される。

- (NSPersistentContainer *)persistentContainer {
    @synchronized (self) {
        if (_persistentContainer == nil) {
            _persistentContainer = [[NSPersistentContainer alloc] initWithName:@"AppName"];
            if (self.databaseURL) {
                NSPersistentStoreDescription *storeDescription = _persistentContainer.persistentStoreDescriptions.firstObject;
                storeDescription.URL = self.databaseURL;
            }
            [_persistentContainer loadPersistentStoresWithCompletionHandler:^(NSPersistentStoreDescription *storeDescription, NSError *error) {
                if (error != nil) {
                    NSLog(@"Unresolved error %@, %@", error, error.userInfo);
                    abort();
                }
            }];
        }
    }
    
    return _persistentContainer;
}

以下の様に databaseURL を変更した後に persistentContainer へのアクセスが発生すると指定の場所へDBが作られる事になる。

    NSURL *databaseURL = [[NSURL fileURLWithPath:NSTemporaryDirectory()] URLByAppendingPathComponent:@"Test.sqlite"];
    appDelegate.databaseURL = databaseURL;

もしかするとテンプレートの persistentContainer メソッドの様に _persistentContainer が nil の場合に初期化処理が走るのではなく、初期化処理をメソッドとして用意してやって、databaseURL の設定と共に初期化処理を明示的に実行させてやっても良いかも知れない。

サンプルコードの全体は以下。
(その他の AppDelegate の処理は割愛して Core Data の実装のみ記述)

Change PersistentContainer URL dynamically.

*1:例えばメモアプリのローカルデータとiCloud上のデータ

*2:DBの作りで1つのDBファイルで複数アカウントを管理する事も可能ではある

*3:開発中の話なので前回の方法+マクロで切り替えとかでも可能

NSPersistentStoreDescription のデフォルト値とカスタマイズ

iOS 10で導入された NSPersistentContainer を使うとCore Dataのセットアップのコードがずいぶん短くなる。Xcode のテンプレートはこんな感じ

- (NSPersistentContainer *)persistentContainer {
    @synchronized (self) {
        if (_persistentContainer == nil) {
            _persistentContainer = [[NSPersistentContainer alloc] initWithName:@"AppName"];
            [_persistentContainer loadPersistentStoresWithCompletionHandler:^(NSPersistentStoreDescription *storeDescription, NSError *error) {
                if (error != nil) {
                    NSLog(@"Unresolved error %@, %@", error, error.userInfo);
                    abort();
                }
            }];
        }
    }
    
    return _persistentContainer;
}

これだけで済んでしまう。
でも以前セットアップで使ってた NSMigratePersistentStoresAutomaticallyOption NSInferMappingModelAutomaticallyOption NSSQLitePragmasOption といったオプション設定はどうなっているの?と疑問に思ったので調査。

設定内容は _persistentContainer.persistentStoreDescriptions で取得できる NSPersistentStoreDescription のインスタンスから参照出来るらしい。
このインスタンスから取得可能なプロパティを調べてみると以下の様になった。

property value
type SQLite
configuration null
URL ~/Library/Application Support/<Name>.sqlite
options {
NSInferMappingModelAutomaticallyOption = 1;
NSMigratePersistentStoresAutomaticallyOption = 1;
}
readOnly NO
timeout 240
sqlitePragmas {
}
shouldAddStoreAsynchronously NO
shouldMigrateStoreAutomatically YES
shouldInferMappingModelAutomatically YES

設定をカスタマイズする

loadPersistentStoresWithCompletionHandler: を呼ぶ前に NSPersistentStoreDescription の各値を設定する事でカスタマイズが出来る。

例えば URL の様に readwrite なプロパティはそのまま素直に変更可能

_persistentContainer = [[NSPersistentContainer alloc] initWithName:@"AppName"];
NSPersistentStoreDescription *storeDescription = _persistentContainer.persistentStoreDescriptions.firstObject;
NSURL *URL = [storeDescription.URL.URLByDeletingLastPathComponent URLByAppendingPathComponent:@"NewLocation.sqlite"];
storeDescription.URL = URL;
[_persistentContainer loadPersistentStoresWithCompletionHandler:^(NSPersistentStoreDescription *storeDescription, NSError *error) {

optionssqlitePragmas は readonly なプロパティになっている代わりに以下の値設定用のメソッドが用意されているのでこれを使う。

- (void)setOption:(nullable NSObject *)option forKey:(NSString *)key;
- (void)setValue:(nullable NSObject *)value forPragmaNamed:(NSString *)name;

例えば以下で SQLite の journal_mode を shm とwal ファイルを生成しない DELETE モードに設定する事が出来る。

_persistentContainer = [[NSPersistentContainer alloc] initWithName:@"AppName"];
NSPersistentStoreDescription *storeDescription = _persistentContainer.persistentStoreDescriptions.firstObject;
[storeDescription setValue:@"DELETE" forPragmaNamed:@"journal_mode"];
[_persistentContainer loadPersistentStoresWithCompletionHandler:^(NSPersistentStoreDescription *storeDescription, NSError *error) {

これらのメソッドを使えばCore Dataのセットアップが従来通り柔軟に出来そうな目処が立つ。

ちなみに shouldMigrateStoreAutomaticallyshouldInferMappingModelAutomaticallyNO にすると optionsNSInferMappingModelAutomaticallyOptionNSMigratePersistentStoresAutomaticallyOptionNO になっていた。
おそらくこれらは良く使うオプションなのでプロパティのフラグ設定と自動で連携して簡単に options にキーと値を設定してくれる様になっているらしい。


参考 SQLite の pragma のリスト
https://sqlite.org/pragma.html

Xcode 9 で無線で開発 Wireless Debugging

WWDC 2017 にて Xcode 9 ではUSB接続無しで無線で繋いで開発出来るって話が出ていたけど、何の気なしに Xcode 9 を起動しても同じLAN内の iPhone がビルドターゲットに出てこないので調べてみたらすぐにやり方が分かった。

WWDC 2017 Session 404 の6分20秒あたり
Debugging with Xcode 9 - WWDC 2017 - Videos - Apple Developer

Xcode のメニュー
Window > Devices and Simulators でデバイスウィンドを開いてデバイス一覧からデバイスを選択すると Connect via network というチェックボックスがあるのでそれをチェック。*1
このチェック項目が表示されるのはiOS 11以降の端末のみである事と、チェック作業の際には端末とMacをUSB接続しておく必要がある事に注意。

チェックすると端末のUSB接続を抜いてもデバイス一覧に表示されたままになって、Xcode のビルドターゲットにも端末が表示されるようになるので後は普段通りに開発可能になる。
ワイヤレスで開発出来るのでAPI的にはARKit、Core Motion、AVFoundationなど、ジャンルとしてはAR、ヘルスケア、スポーツ、カメラ系の端末を持って動かす類のアプリの開発が便利になりそう。

*1:β版のためスクショ無し

PDFView の表示設定まとめ

関連記事

koze.hatenablog.jp

※ iOS 11 beta 時点での検証です

検証コード
- (void)viewDidLoad
{
    [super viewDidLoad];
    
    PDFView *view = [[PDFView alloc] initWithFrame:self.view.bounds];
    view.autoresizingMask = UIViewAutoresizingFlexibleWidth | UIViewAutoresizingFlexibleHeight;
    view.autoScales = YES;
    view.displayDirection = kPDFDisplayDirectionVertical;
    view.displayMode = kPDFDisplaySinglePage;
    view.displaysRTL = NO;
    [self.view addSubview:view];
    
    NSURL *URL = [[NSBundle mainBundle] URLForResource:@"test" withExtension:@"pdf"];
    PDFDocument *document = [[PDFDocument alloc] initWithURL:URL];
    view.document = document;
}
検証結果

画像の数字は表示ページ数
白背景は初期状態で表示される部分、灰色部分はスクロール領域の部分

displaysRTL = NO

kPDFDisplayDirectionVertical kPDFDisplayDirectionHorizontal
kPDFDisplaySinglePage f:id:Koze:20170612202100p:plain f:id:Koze:20170612202100p:plain
kPDFDisplaySinglePageContinuous f:id:Koze:20170612202439p:plain f:id:Koze:20170612203519p:plain
kPDFDisplayTwoUp f:id:Koze:20170612202611p:plain f:id:Koze:20170612202611p:plain
kPDFDisplayTwoUpContinuous f:id:Koze:20170612202724p:plain f:id:Koze:20170612202724p:plain

displaysRTL = YES

kPDFDisplayDirectionVertical kPDFDisplayDirectionHorizontal
kPDFDisplaySinglePage f:id:Koze:20170612202100p:plain f:id:Koze:20170612202100p:plain
kPDFDisplaySinglePageContinuous f:id:Koze:20170612202439p:plain f:id:Koze:20170612203519p:plain
kPDFDisplayTwoUp f:id:Koze:20170612204616p:plain f:id:Koze:20170612204616p:plain
kPDFDisplayTwoUpContinuous f:id:Koze:20170612204920p:plain f:id:Koze:20170612204920p:plain

以下の2点がポイント

  • displaysRTL の設定は kPDFDisplayTwoUpkPDFDisplayTwoUpContinuous の時のみ効果有りで見開きの左右を指定するパラメータ
  • kPDFDisplayTwoUpContinuous にしていると kPDFDisplayDirectionHorizontal の設定は効果無し。見開きのまま横スクロールは出来ない。(仮に横スクロール出来たしたとしても kPDFDisplaySinglePageContinuous と見た目が変わらないため?)

という事で、ページ送り(スクロール)自体を右から左にしてくれるオプションは無いようなので日本の小説や漫画など縦書きのコンテンツを表示させる場合は Continuous モードを使わないで自前でページ移動を実装する必要がある。

Vision Framework で水平角検出(傾き) Horizon Detection

iOS 11 関連記事
iOS 11 UIKit の変更点 - ObjecTips
iOS 11 Foundation の変更点 - ObjecTips
iOS 11 Messages Framework の変更点 - ObjecTips
iOS 11 PDFKit - ObjecTips
iOS 11 Core Image の変更点 - ObjecTips
koze.hatenablog.jp

Horizon Detection

Vision Framework を使って傾き検出と得られた結果から表示の補正を行う。
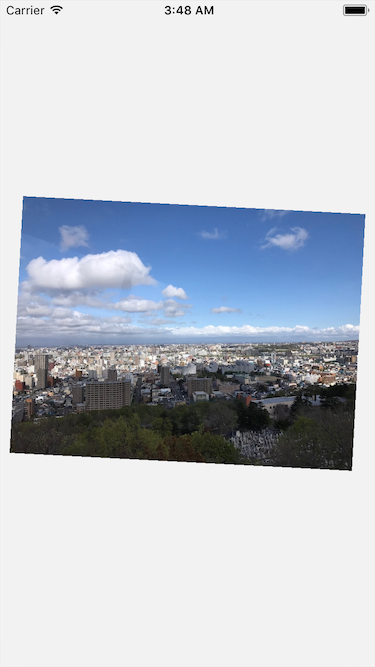
カメラロールの中に程良く傾いた景色の画像があったのでそれを使う。まず何も処理を入れず普通に UIImage を作成して UIImageView に配置する。

f:id:Koze:20170608035929p:plain

実装

Horizon Detection with Vision Framework

まず VNImageRequestHandler を作成。
今回は UIImage 経由で CGImageRef から作成している。
次に VNDetectHorizonRequest 作成しハンドラを設定してリクエストを実行する。

うまく傾きを検出できると request.resultsVNHorizonObservationが入ってくる。
VNHorizonObservation の持つプロパティは以下2つ

@property (readonly, nonatomic, assign) CGAffineTransform transform;
@property (readonly, nonatomic, assign) CGFloat angle;

ドキュメントにもヘッダにも何も書かれていないけど、angle は検出された傾きだろうという事が分かる。ちなみにこの値は radian になっている。 この angle から以下の様に UIImageView を補正表示するための CGAffineTransform を作成する。

CGAffineTransform t = CGAffineTransformMakeRotation(-horizonObservation.angle);

これまで同様に座標系が逆になっているので結果の angle にマイナス値をかけて値を補正している。
この CGAffineTransformUIImageView に設定してやる。

実行結果

以下の様になる。

f:id:Koze:20170608040856p:plain

正しく傾きの補正が出来ている模様。
UIImageView の中心をずらさずに回転のみで補正した形になる。

コメントアウト部分にある様に

CGAffineTransformInvert(CGAffineTransformMakeRotation(horizonObservation.angle));

この様に値を補正してやっても同じ結果になる。

実行結果2

検出結果の VNHorizonObservation にもう1つプロパティがある。

@property (readonly, nonatomic, assign) CGAffineTransform transform;

これを使って UIImageView を変形してみる。
検出結果の座標系は逆になっているので先の例と同じ様に Invert で補正してやる。

CGAffineTransformInvert(horizonObservation.transform);

結果は以下

f:id:Koze:20170608041443p:plain

傾きの補正はOKっぽい。
ただ位置の変形がこれでいいのかどうか、、?
transform プロパティが何を表しているのか、どういった値が入ってくるのか現時点ではドキュメントも無いしWWDCのセッションもまだなので何かしら解説が出るのを待ってみたい。

iOS 11 Core Image の変更点

iOS 11 関連記事
iOS 11 UIKit の変更点 - ObjecTips
iOS 11 Foundation の変更点 - ObjecTips
iOS 11 Messages Framework の変更点 - ObjecTips
iOS 11 PDFKit - ObjecTips
Vision Framework でテキスト検出 Text Detection - ObjecTips
Vision Framework で水平角検出(傾き) Horizon Detection - ObjecTips

Core Image

CIImage - Core Image | Apple Developer Documentation

CIImage
@property (nonatomic, readonly, nullable) AVDepthData *depthData NS_AVAILABLE(10_13,11_0);

Depthデータの取得。
イニシャライザのオプションで kCIImageAuxiliaryDepthkCIImageAuxiliaryDisparity のどちらかを YES に設定すると取得出来るらしい。このオプションを用いるとプライマリの画像の代わりに補助(auxiliary)画像の CIImage が作られて、もし補助画像が無い場合は nil になってしまうらしい。
補助画像は half float のモノクロ画像との事。

/* Returns a new image by changing the receiver's sample mode to bilinear interpolation. */
- (CIImage *)imageBySamplingLinear NS_AVAILABLE(10_13, 11_0)
  NS_SWIFT_NAME(samplingLinear());

/* Returns a new image by changing the receiver's sample mode to nearest neighbor. */
- (CIImage *)imageBySamplingNearest NS_AVAILABLE(10_13, 11_0)
  NS_SWIFT_NAME(samplingNearest());

画像の補間モードをバイリニア補間(bilinear interpolation)とニアレストネイバー(nearest neighbor)という補間方法に変換してくれるらしい。

CIFIlter

iOS 11 で追加された CIFIlter

CIAreaMinMaxRed
CIAttributedTextImageGenerator
CIBarcodeGenerator
CIBicubicScaleTransform
CIBokehBlur
CIColorCubesMixedWithMask
CIColorCurves
CIDepthBlurEffect
CIDepthToDisparity
CIDisparityToDepth
CIEdgePreserveUpsampleFilter
CILabDeltaE
CITextImageGenerator

DepthToDisparity と DepthToDisparity が存在していて Depth と Disparity の相互変換が出来るという事が分かる。

CIContext
- (nullable NSData*) PNGRepresentationOfImage:(CIImage*)image
                                       format:(CIFormat)format
                                   colorSpace:(CGColorSpaceRef)colorSpace
                                      options:(NSDictionary*)options NS_AVAILABLE(10_13,11_0);
- (nullable NSData*) HEIFRepresentationOfImage:(CIImage*)image
                                        format:(CIFormat)format
                                    colorSpace:(CGColorSpaceRef)colorSpace
                                       options:(NSDictionary*)options NS_AVAILABLE(10_13,11_0);
- (BOOL) writePNGRepresentationOfImage:(CIImage*)image
                                 toURL:(NSURL*)url
                                format:(CIFormat)format
                            colorSpace:(CGColorSpaceRef)colorSpace
                               options:(NSDictionary*)options
                                 error:(NSError **)errorPtr NS_AVAILABLE(10_13,11_0);
- (BOOL) writeHEIFRepresentationOfImage:(CIImage*)image
                                  toURL:(NSURL*)url
                                 format:(CIFormat)format
                             colorSpace:(CGColorSpaceRef)colorSpace
                                options:(NSDictionary*)options
                                  error:(NSError **)errorPtr NS_AVAILABLE(10_12,10_0);

これまではTIFFとJPEGに書き出す事が可能だったのが、PNGとHEIFへの書き出しも可能になった。

CORE_IMAGE_EXPORT NSString * const kCIImageRepresentationAVDepthData NS_AVAILABLE(10_13,11_0);
CORE_IMAGE_EXPORT NSString * const kCIImageRepresentationDepthImage NS_AVAILABLE(10_13,11_0);
CORE_IMAGE_EXPORT NSString * const kCIImageRepresentationDisparityImage NS_AVAILABLE(10_13,11_0);

上記の書き出しメソッドにオプションとして指定する事が出来る。ただしヘッダによればTIFFとPNGはオプション指定が不可で、JPEGとHEIFの場合にこれらのオプションが指定可能らしい。

CIRenderTask, CIRenderDestination, CIRenderInfo

非同期レンダリングのためのクラス群 CIRenderTask には

- (nullable CIRenderInfo*) waitUntilCompletedAndReturnError:(NSError**)error;

というメソッドがあるので同期的にも使えそう。

CIKernel
+ (nullable instancetype)kernelWithFunctionName:(NSString *)name
                           fromMetalLibraryData:(NSData *)data
                                          error:(NSError **)error NS_AVAILABLE(10_13, 11_0);

+ (nullable instancetype)kernelWithFunctionName:(NSString *)name
                           fromMetalLibraryData:(NSData *)data
                              outputPixelFormat:(CIFormat)format
                                          error:(NSError **)error NS_AVAILABLE(10_13, 11_0);

data には Core Image Standard Library でコンパイルされた mtallib ファイルのデータ、name には Metal Shading Language で書かれた関数名が必要らしい。

CIBlendKernel

2つの画像をブレンドする CIColorKernel のプリセット群の様なものが用意された。
例えば

@property (class, strong, readonly) CIBlendKernel *componentAdd;
@property (class, strong, readonly) CIBlendKernel *componentMultiply;

などクラスプロパティで簡易的にカーネル処理の色フィルタを呼び出す事が出来る。その数50個

CIBarcodeDescriptor

バーコードデータのモデルクラスでサブクラスとして以下が存在する。

  • CIQRCodeDescriptor
  • CIAztecCodeDescriptor
  • CIPDF417CodeDescriptor
  • CIDataMatrixCodeDescriptor

バーコードの生成と、Core Image, Vision, AVFoundation でのバーコードの検出で使用されるとの事。

CIQRCodeFeature
@property (nullable, readonly) CIQRCodeDescriptor *symbolDescriptor NS_AVAILABLE(10_13, 11_0);

前述のバーコードのモデルクラスを取得可能。

感想

CIBlendKernel のプリセット呼び出しは簡単だけど CIFilter のカラーブレンド系とパフォーマンスが違うのか気になる。呼び出し型が違うだけで中の処理は同じではないか?とも思う。
HEIFデータの扱いとか AVDepthData の活用とかはしらばくは2眼カメラの iPhone 7 Plus に限定されてしまうかも知れないけど面白そう。このあたりの詳細は AVFoundation を調べる必要がありそう。

iOS 11 PDFKit

iOS 11 関連記事
iOS 11 UIKit の変更点 - ObjecTips
iOS 11 Foundation の変更点 - ObjecTips
iOS 11 Messages Framework の変更点 - ObjecTips
iOS 11 Core Image の変更点 - ObjecTips
Vision Framework でテキスト検出 Text Detection - ObjecTips
Vision Framework で水平角検出(傾き) Horizon Detection - ObjecTips

koze.hatenablog.jp

PDFKit について

PDFKit | Apple Developer Documentation

iOS 11 で登場した PDFKit は macOS では 10.4 Tiger から存在しているPDF周りの高レベルの Framework で、ただの Core Graphics 関数のラップではなくかなり高機能になっている。

NSURLPDFDocument を初期化するだけでPDF内の文字列が取得できて、文字列検索もできて、ページの入れ替え差し替え、書き出し、アウトライン情報の取得まで出来る。
(アウトライン情報は階層構造を持つリンク付きの目次のようなもので、辞書構造の中にはタイトルと階層情報、リンクの飛び先の情報が入っている。)

PDFViewPDFDocument を設定すればページ移動、拡大縮小、文字列選択、リンク移動の機能を持つ高機能ビューアが出来てしまう。見開き表示もにも対応。PDFThumbnailView によるサムネイル一覧表示までサポートされている。

PDFDocument から取り出したページ情報 PDFPage を使ってアノテーションの追加や指定箇所の文字列の選択、1文字毎の bounds の取得なんかも出来てしまう。

今からPDFビューアを作る人は絶対にこの Framework を使った方がいい。(ていうか何で今まで iOS に持ってきてくれなかったんだ、、)
さらに今回のアップデートでは macOS でも初出の機能があるのでその辺を中心に見ていく。

PDFView
@property (nonatomic) PDFDisplayDirection displayDirection PDFKIT_AVAILABLE(10_13, 11_0);
// Display direction.
PDFKIT_ENUM_AVAILABLE(10_13, 11_0)
typedef NS_ENUM(NSInteger, PDFDisplayDirection)
{
    kPDFDisplayDirectionVertical = 0,
    kPDFDisplayDirectionHorizontal = 1,
};

縦書きPDF対応
多分文字選択時のキャレットの向きとかをよしなにやってくれる。最高
※APIを試してみたところ、displayModekPDFDisplaySinglePageContinuouskPDFDisplayTwoUpContinuous の際に縦スクロールにするか横スクロールにするかを指定できる機能でした。

// Specifies presentation of pages from right-to-left. Defaults to NO.
@property (nonatomic) BOOL displaysRTL PDFKIT_AVAILABLE(10_13, 11_0);

ページの右送り、左送りの変更もこれでやってくれる。最高
※APIを試してみたところ、displayModekPDFDisplayTwoUpkPDFDisplayTwoUpContinuous の時に右側に若番のページを表示してその次のページを左側に表示する機能でした。

@property (nonatomic) CGFloat minScaleFactor PDFKIT_AVAILABLE(10_13, 11_0);
@property (nonatomic) CGFloat maxScaleFactor PDFKIT_AVAILABLE(10_13, 11_0);
@property (nonatomic, readonly) CGFloat sizeToFitScaleFactor PDFKIT_AVAILABLE(10_13, 11_0);

拡大縮小のパラメータ設定等

@property (nonatomic) PDFEdgeInsets pageBreakMargins PDFKIT_AVAILABLE(10_13, 11_0);

マージン

- (void)usePageViewController:(BOOL)enable withViewOptions:(nullable NSDictionary*)viewOptions PDFKIT_AVAILABLE(NA, 11_0);
- (BOOL)isUsingPageViewController PDFKIT_AVAILABLE(NA, 11_0);

これは iOS のみ。
UIPageViewController を使ったレイアウトとナビゲーションにしてくれるらしい。

PDFThumbnailView
@property (nonatomic) UIEdgeInsets contentInset;

iOS のみとドキュメントには書いてあるけど、ヘッダでは特に指定なし。

PDFDocumentDelegate

PDFDocumentDelegate - PDFKit | Apple Developer Documentation

既存で用意されている各種通知の delegate 版が追加されている。

PDFDocument
@property (nonatomic, readonly) BOOL allowsPrinting;                            // Printing the document
@property (nonatomic, readonly) BOOL allowsCopying;                             // Extract content (text, images, etc.)
@property (nonatomic, readonly) BOOL allowsDocumentChanges;                     // Modify the document contents except for page management (document attrubutes)
@property (nonatomic, readonly) BOOL allowsDocumentAssembly;                    // Page management: insert, delete, and rotate pages
@property (nonatomic, readonly) BOOL allowsContentAccessibility;                // Extract content, but only for the purpose of accessibility
@property (nonatomic, readonly) BOOL allowsCommenting;                          // Create or modify annotations, including form field entries
@property (nonatomic, readonly) BOOL allowsFormFieldEntry;                      // Modify form field entries

既存APIではPDFがロックされているか、ロック解除後はプリントが許可されているか、コピーが許可されているかといった権限の取得が出来た。
新しいAPIでは上記のように、ドキュメントの変更許可、アクセシビリティ(スクリーンリーダー等)のみで利用可能か、フォームを編集出来るかなど細かく権限を取得できるようになっている。
ちなみに後述の Core Graphics ではもう少し細かく権限を取得できる。

PDFPage
- (PDFKitPlatformImage *)thumbnailOfSize:(PDFSize)size forBox:(PDFDisplayBox)box PDFKIT_AVAILABLE(10_13, 11_0);

サムネイル取得APIが追加された。PDFKitPlatformImage は iOS では UIImage macOS では NSImage が返される。
PDFSize は iOS では CGSize macOS では NSSize を渡す。

PDFSelection
- (void)extendSelectionForLineBoundaries PDFKIT_AVAILABLE(10_13, 11_0);

現在選択中のテキスト範囲をよしなに拡張してくれる。

PDFAnnotation

多いのでドキュメントを参照

PDFAnnotation - PDFKit | Apple Developer Documentation

PDFAppearanceCharacteristics

これもアノテーション周りのAPIらしい。必要になったら調査。

Core Graphics

Core Graphics のPDF周りのAPIも少し追加になっている。

CGPDFDocumentGetAccessPermissions
CG_EXTERN CGPDFAccessPermissions CGPDFDocumentGetAccessPermissions(CGPDFDocumentRef document)
    CG_AVAILABLE_STARTING(__MAC_10_13, __IPHONE_11_0);
typedef CF_OPTIONS(uint32_t, CGPDFAccessPermissions) {
    kCGPDFAllowsLowQualityPrinting    = (1 << 0),   // Print at up to 150 DPI
    kCGPDFAllowsHighQualityPrinting   = (1 << 1),   // Print at any DPI
    kCGPDFAllowsDocumentChanges       = (1 << 2),   // Modify the document contents except for page management
    kCGPDFAllowsDocumentAssembly      = (1 << 3),   // Page management: insert, delete, and rotate pages
    kCGPDFAllowsContentCopying        = (1 << 4),   // Extract content (text, images, etc.)
    kCGPDFAllowsContentAccessibility  = (1 << 5),   // Extract content, but only for the purpose of accessibility
    kCGPDFAllowsCommenting            = (1 << 6),   // Create or modify annotations, including form field entries
    kCGPDFAllowsFormFieldEntry        = (1 << 7)    // Modify form field entries
};

上記の様に PDFKit では取得出来ないプリント品質によるプリント許可ついての権限が取得出来る。

CGPDFDocumentGetOutline
CG_EXTERN __nullable CFDictionaryRef CGPDFDocumentGetOutline(CGPDFDocumentRef document)
    CG_AVAILABLE_STARTING(__MAC_10_13, __IPHONE_11_0);

アウトライン情報の取得が出来る。 アウトラインの辞書情報には以下の情報が入っている。

  • Title - CFString型のタイトル
  • Children - CFArray of CFDictionaries型の子アウトライン情報の配列
  • Destination - CFNumber型のページ番号、または CFURL型のファイルURL
  • DestinationRect - Destination がページ番号の時のみリンク先を示す CFDictionary 型に変換された CGRect の座標
CG_EXTERN void CGPDFContextSetOutline(CGContextRef context, __nullable CFDictionaryRef outline)
  CG_AVAILABLE_STARTING(__MAC_10_13, __IPHONE_11_0);

PDFデータを作成する際にこのアウトライン情報を書き込む事も出来るらしい。
この2つの Core Graphics API は iOS だけでなく macOS でも初出のAPIとなっている。

まとめ

PDFKit 最高、使いましょう。